From Saved Model to Live API: Building an ML API in R with Plumber
Training a machine learning model is fun, you cleaned the data, engineered the features, tuned the hyperparameters and finally trained the model that works. A lot of data science projects stop at “hey look, my model gets an accuracy of 93% !” stage. The notebook gets saved, maybe a presentation is made, and then the model quietly sits in your laptop into a folder called final_final_v3_really_final 😅.
Cool.. so how do we use it?🤔 Because a model sitting in an .RDA file in your laptop is not exactly production-ready.
Why bother turning your model into an API?
A trained model only becomes genuinely useful when something else can interact with it.
This “something else” might be a web app, another backend service, a dashboard, or just a teammate who doesn’t want to open your R script and manually run predictions.
This is where APIs come in.
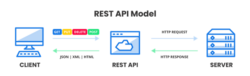
An API (Application Programming Interface) gives your model a doorway. A RESTful API is an architectural style for an API that uses HTTP requests to access and use data. And receive data back in XML, JSON or HTML formats.
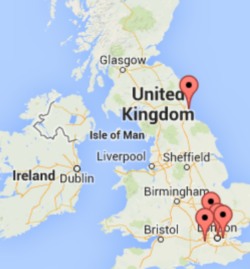
APIs are something we use every day, often without even realising it. Take Google Maps for example. Imagine your friend recommends a restaurant across town. Instead of figuring out the route yourself, you simply type it into Google Maps and instantly get directions and traffic updates. Behind that quick and easy experience is an API working in the background, fetching and delivering the information you need. That’s exactly what makes APIs so powerful - they take complex processes and make them simple for the user.
If you work in R one of the easiest ways to build an API around your ML model is using the Plumber package.
In this guide, I’ll walk you through exactly how to take a trained model, wrap it in an API using Plumber, test it locally and get it ready for real-world use.
No DevOps rabbit holes. No overengineering. Just a clean, practical path from Model ➡️ API.

What we are building
In this tutorial we’ll assume you already have:
- A trained machine learning model
- And the model is saved as an .rda file
- R studio and R installed
We will build an API that loads the saved model, accepts inputs and return the predictions.
For this example, I am using a trained random forest model that classifies the good old Iris dataset.
Step 1: Create your API file
Create a new file called:
Plumber.R
Step 2: Install and load packages
First the required packages need to be installed. Obviously, plumber and any other package that might be needed for you ML model.
install.packages(“plumber”)
install.packages(“randomForest”)
Then load it:
library(plumber)
library(randomForest)
That’s it. This is one of the reasons I like Plumber, the setup doesn’t feel like assembling IKEA furniture without instructions, it is refreshingly boring. And boring is underrated in production 😜.
Step 3: Load the model
model <- get(load('iris_model.rda'))
Now every time your API starts, it loads the saved model into memory. This is important, you don’t want to retrain the model every time someone makes a request unless your goal is to heat the Earth up 🥵.
Note: make sure that the model is saved to the working directory of your API file before loading it.
️Step 4: Define prediction endpoint
This is where the API magic happens,
#* Predict iris species
#* @post /predict the class
#* @serializer unboxedJSON
function(s_len, s_width, p_len, p_width) {
newdata <- data.frame(
Sepal.Length = as.numeric(s_len),
Sepal.Width = as.numeric(s_width),
Petal.Length = as.numeric(p_len),
Petal.Width = as.numeric(p_width)
)
prediction <- predict(model, newdata)
return(list(class = as.character(prediction)))
}
What’s happening here?
Let’s break this down.
- #* is a special comment that is used for plumber to annotate the function. In this case we have two special comments @post/predict the class and @serializer unboxedJSON
- @post/predict the class creates an endpoint.
- @serializer unboxedJSON means that the function output should be converted from native type format to JSON.
- The function accepts input parameters, a new dataframe is created using these inputs and the saved model makes the prediction.
Step 5: Run the API
Now for the moment of truth, we need to execute this service we have coded. For this simply create a new file called run_API.R and add these lines of code to it:
library(plumber)
pr <- plumber::plumb("Plumber.R")
pr$run(port = 8000, host="0.0.0.0",swagger = TRUE)
We simply load the Plumber.R file we just wrote and execute it. When run Plumber creates an HTTP server listening in port 8000.
Now run this file, if successful you should see something like this:

Step 6: Test your API
Plumber automatically gives you a mini-interactive documentation page where you can enter the inputs and test your API.
Alternatively, you can open http://127.0.0.1:8000/__docs__/ in your browser.
This is what it looks like:

Once executed it gives a response like this, and there you have it – a local API for your model 🥳

Where to deploy next?
Local APIs are useful, but eventually you’ll want to host this somewhere. My recommendation would be to: containerize early.
Even if deployment feels “future you’s problem,” it becomes current-you’s problem faster than expected.
Final thoughts
Machine learning without deployment is like building a car and never taking it out of the garage. Sure, the engine works. But nobody gets anywhere. Plumber is one of the simplest ways to bridge that gap in R.
It won’t solve every deployment problem, and eventually you may need authentication, logging, monitoring, versioning, and all the other glamorous realities of production systems.
But for turning a saved model into something usable?
It’s hard to beat.
You go from:
trained model sitting on disk ➡️ callable prediction service with surprisingly little code. And honestly, that feels a bit magical the first time you do it.
Kudos on building an API for your model.


By Ameena Farooq
Data Scientist
LIDA Data Analytics Team
The Data Analytics Team are the in-house, technical LASER support at LIDA
The team provide end-to-end support from project conception to closure, and design personalised data environments tailored to your data and requirements. They are a team of dedicated specialists in data management, data analysis, software engineering and information governance, who collaborate with LIDA researchers across all stages of their projects and offer an in-house Trusted Research Environment (LASER).